
A planter is the only part of a landscape scheme deliberately designed to hold soil and water above a waterproof membrane, and it is the detail that goes wrong most often. Raised beds that looked immaculate at handover are waterlogged within two seasons, the planting dies back, and the first sign anyone notices downstairs is a damp patch on a soffit. Among the waterproofing companies in Dubai dealing with podium and terrace leaks, planters account for a disproportionate share of the callouts.
The frustrating part is that almost none of it is caused by anything exotic. Planters flood because of a handful of predictable detailing decisions, most of them made quickly at construction stage by someone who assumed a hole in the bottom was enough.
This article covers why planter drainage behaves differently from drainage anywhere else on a building, what a correctly detailed raised bed looks like in section, how a drainage board differs from the alternatives, and how to work out what is wrong with a planter that already floods.
Why Raised Beds Flood
A planter floods when water entering it exceeds water leaving it, and in Dubai the inflow is larger and more constant than most people assume while the outflow is usually restricted by one of four detailing faults.
Inflow is not rainfall. Rainfall here is negligible for most of the year. The real inflow is irrigation, running daily or twice daily through summer, every day of the year on many schemes. A planter is receiving a controlled flood on a schedule, which means the drainage detail has to work continuously rather than occasionally.
Outflow fails for four reasons, and usually more than one is present:
- No drainage layer, so water has no horizontal path to the outlet and simply sits in the soil
- No filter fabric, so fines wash down and block whatever drainage layer exists
- A flat base, so even a working drainage layer has no gradient to move water toward the outlet
- An outlet that is undersized, badly positioned or buried with no way to clear it
Fix the inflow assumption and all four outflow faults and the planter works. Miss any one and it will eventually fail.
The Perched Water Table: The Bit Nobody Explains
There is a piece of soil physics behind planter flooding that is worth understanding, because it explains why “we drilled drainage holes” is not an answer.
When soil sits in a container, water does not drain out of the base as soon as it arrives. Surface tension holds it in the pore spaces, and water only begins to leave once the soil at the base of the container becomes fully saturated. The result is a saturated zone that forms at the bottom of the container and stays there. This is the perched water table, and it exists in every container regardless of how many holes are in the bottom.
Two consequences follow, and both are counter-intuitive.
The first is that the depth of that saturated zone is governed by the growing medium, not by the depth of the planter. A fine, heavy soil produces a deeper saturated layer than a coarse, open one. Switching to a coarser mineral-based medium genuinely reduces waterlogging. Adding more depth of the same soil does not.
The second is that a shallow planter is proportionally far worse than a deep one. If a particular medium produces a 100 mm saturated zone, that is a third of a 300 mm raised bed and barely a tenth of a 1 m tree pit. Shallow planters with ornamental planting are the ones that drown, and they are also the ones most often filled with ordinary topsoil.
This is also why the old trick of putting a layer of gravel in the bottom of a planter makes things worse rather than better. Water will not cross from fine soil into coarse gravel until the soil above is saturated, so the gravel layer raises the perched water table instead of lowering it. What actually drains a planter is a continuous void with a gradient and an outlet, separated from the soil by a filter fabric.
A Correctly Detailed Planter in Section
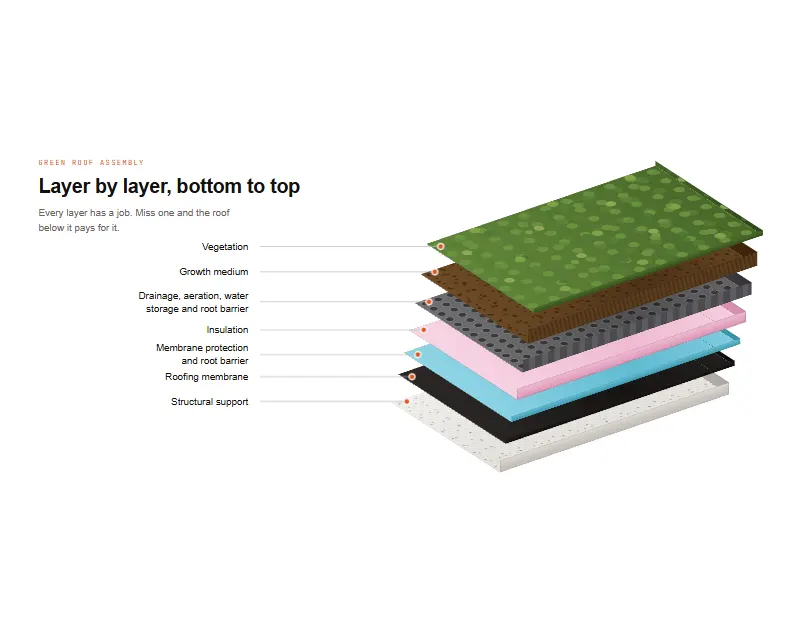
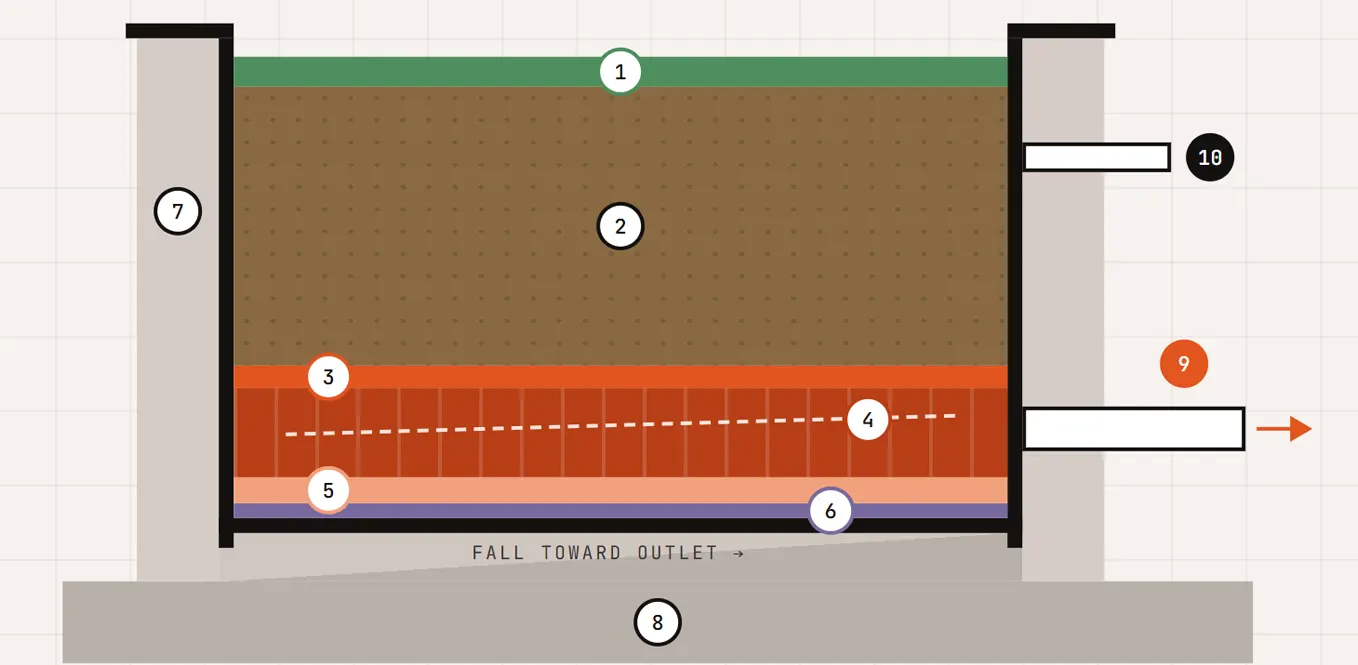
Reading from the planting down, a planter that works has ten components. Each one follows from what the layer beneath it needs.
- Planting
- Growing medium. A coarse engineered mineral blend, not topsoil
- Filter geotextile. Holds the fines back while letting water through
- Drainage board or cell. A continuous void with a clear path to the outlet
- Protection fleece. Cushions everything below from the drainage layer above
- Root barrier. Separate sheet unless the membrane is certified root resistant
- Waterproofing tanking. Up every internal wall face and dressed over the rim
- Structural base. Laid to a fall toward the outlet
- Outlet with rodding access. Set at drainage layer level, never at soil level
- Overflow. Positioned above the outlet as a secondary release
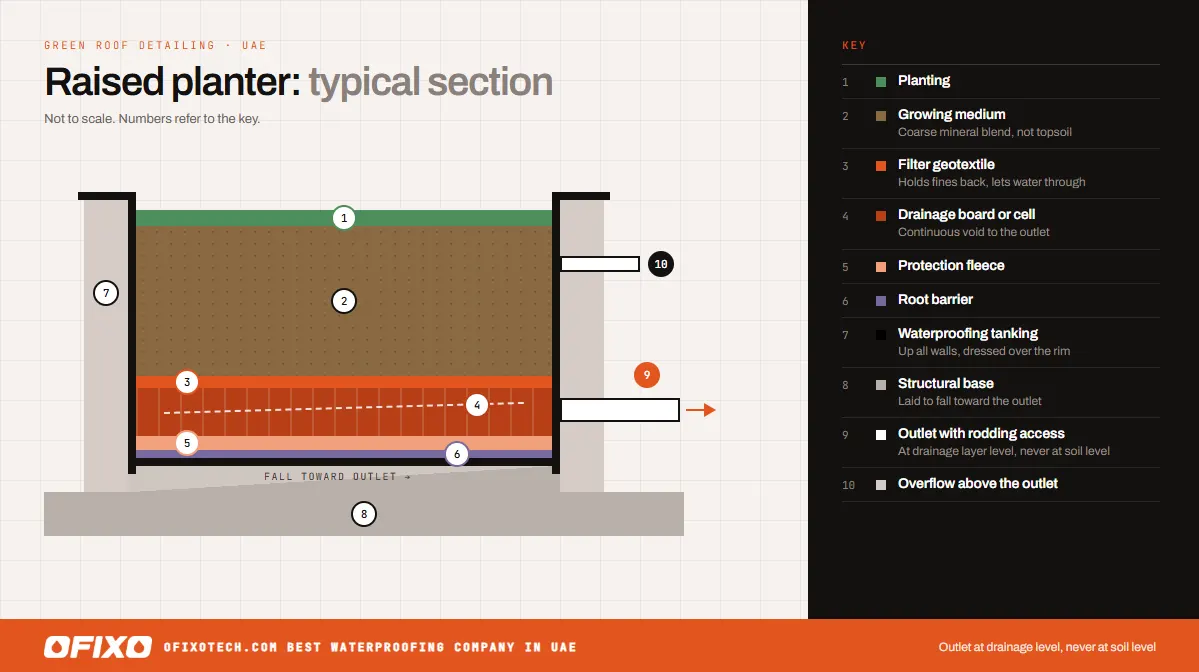
The sequence is the same as any planter waterproofing build-up, and it follows the same logic as a green roof. If you have read our guide to the drainage cell and filter fabric order, you will recognise it, with three differences that are specific to planters.
The first is that the waterproofing has to be tanked, not just laid flat. A planter holds a standing head of water against its walls, so the membrane must run up every internal face and be dressed over the rim or terminated in a proper chase. Stopping it at the base leaves the wall-to-base junction exposed, which is where planters leak.
The second is that the outlet sits at drainage layer level, not at soil level. Water travelling through the drainage board has to be able to leave at the bottom of the void. An outlet set higher simply guarantees a permanent reservoir underneath it.
The third is that the base needs a fall. Planter bases are frequently cast dead flat because they are small, but a drainage board conveys water, it does not create gradient. Aim for 1:80 minimum toward the outlet.
Drainage Board or Drainage Cell?
Both create the void. They differ in depth, strength and how they handle filtration.
| Drainage board | Drainage cell | |
|---|---|---|
| Typical depth | 8 to 25 mm | 20 to 60 mm |
| Form | Dimpled sheet, often with bonded geotextile | Moulded egg-crate panel |
| Filter layer | Frequently pre-bonded | Separate fabric laid over |
| Compressive strength | Lower | Higher, suits deep fill and tree pits |
| Best suited to | Shallow ornamental planters, wall-side beds | Deep beds, tree pits, podium landscape |
For most raised beds under about 600 mm of soil, a drainage board with a bonded filter is the practical choice. It is faster to install, and the bonded fabric removes any chance of someone laying the filter on the wrong side. Check which face carries the geotextile before the first sheet goes down, because a bonded board laid upside down is worse than no board at all.
For tree pits, deep intensive beds and anything a vehicle might cross, use a drainage cell and specify the long-term compressive strength with a creep factor applied, not the short-term peak figure from the brochure.
Loose gravel is the one option to avoid. It raises the perched water table, it silts up without a filter, and it adds significant weight for very little drainage benefit.
What the UAE Climate Changes
Most planter guidance is written for temperate climates where irrigation is seasonal. Four things differ here.
Irrigation is the main hydraulic load. Size the drainage for daily irrigation volume plus a storm allowance, not for annual rainfall. A planter can be hydraulically overloaded on a day with no weather at all.
Salt has to be flushed out. Treated sewage effluent and desalinated water both carry dissolved solids, and evaporation concentrates them in the root zone. The standard response is a leaching fraction, deliberately over-irrigating so surplus water carries salt out through the drainage layer. That only works if the drainage layer actually discharges. A silted planter turns salinity management into salt accumulation, and the planting declines for reasons that look like drought. The wider context is in our guide to salt air corrosion on coastal buildings.
Dust loads the filter from above. Airborne dust settles on the soil surface continuously and migrates down with every irrigation cycle, adding to the fine fraction the filter has to cope with. Specify filter fabric at the upper end of the flow-rate range rather than the minimum. Deposition rates are covered in our guide to sandstorm damage to roofs.
Rain arrives all at once. Annual rainfall of 140 to 200 mm invites conservative sizing. April 2024, when parts of the country took more than a year’s rain inside 24 hours, showed what that assumption costs. Where attenuation is a genuine design requirement, a blue green roof system with controlled discharge is the right answer rather than an oversized board.
Six Detailing Faults That Cause Flooding
Drainage holes instead of a drainage layer. Holes drilled through the base of a planter drain the few millimetres of soil immediately above each hole. Everywhere else stays saturated. A hole is an outlet, not a drainage system.
No filter fabric over the drainage layer. The void silts up progressively, usually taking two to four years under daily irrigation, which is long enough that nobody connects the failure to installation.
Gravel as the drainage layer. Raises the perched water table rather than lowering it, for the reason set out above.
Topsoil as the growing medium. Compacts, holds excessive water, weighs far more saturated, and its fine fraction is exactly what blinds the filter. Use an engineered coarse mineral blend.
Waterproofing stopped at the base. The wall-to-base junction then takes a standing head of water with no protection, and that is where the leak starts. Tanking must be continuous, and movement joints through planters need proper expansion joint detailing.
Outlets with no access. A buried outlet cannot be cleared, and in this climate it will need clearing. Every planter outlet needs a rodding point or inspection chamber reachable without excavating the bed.
Diagnosing a Planter That Already Floods
Before anything is dug out, work through the sequence below. It usually identifies the fault without a full strip-out.
- Turn the irrigation off for a week. If the water level drops noticeably, the system is hydraulically overloaded rather than blocked. If nothing changes, the outlet is blocked or missing.
- Find the outlet and test it. Pour a measured volume of water directly into the drainage layer at the opposite end. If it does not appear at the outlet within minutes, the void is silted or there is no fall.
- Dig a small inspection pit at the lowest corner. Down to the drainage layer only. You are looking for whether a drainage board exists, whether a filter fabric is present and which side of the board it is on, and whether the void is packed with soil.
- Check the growing medium. Squeeze a handful from 150 mm down. If it moulds into a dense ball and smells sour, the medium is too fine and anaerobic conditions have set in.
- Look below. Inspect the soffit, wall or space directly beneath the planter for staining, efflorescence or damp. A hidden moisture survey finds what a visual check misses, and where water has already reached the structure, water leakage injection can stop active ingress while the planter itself is rebuilt.
If the diagnosis points to a missing or wrongly placed filter, the planter has to come out and be rebuilt. There is no retrofit for a silted drainage void. The one consolation is that the work is contained, and it is an opportunity to inspect the membrane properly before it is covered again.
Where water has been sitting against the structure for years, check the concrete as well as the membrane. Prolonged saturation around planters is a common trigger for the rust staining and delamination that leads to concrete restoration work, and cracks that have opened up need concrete crack repair rather than patching.
Specifying the Waterproofing Inside a Planter
A planter is closer to a water tank than to a roof. It holds a head of water against its walls, permanently in places, so the membrane specification should reflect that.
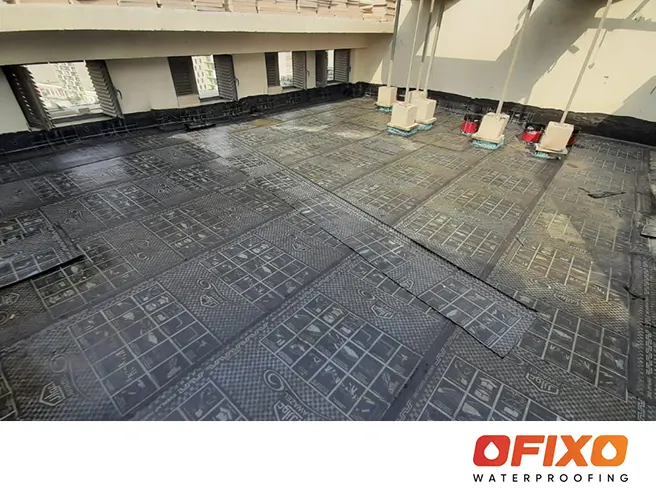
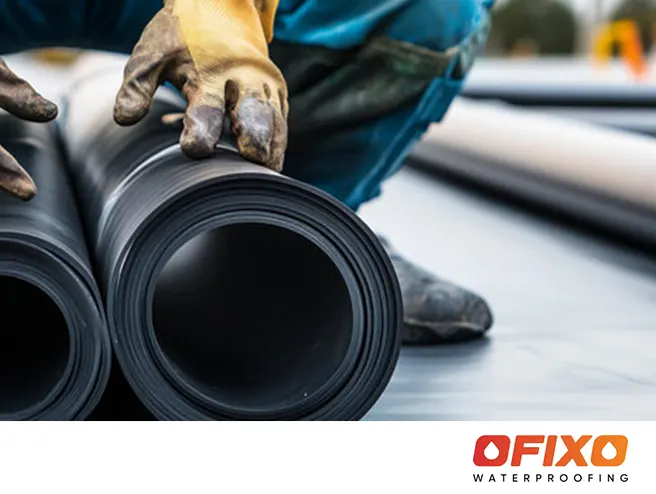
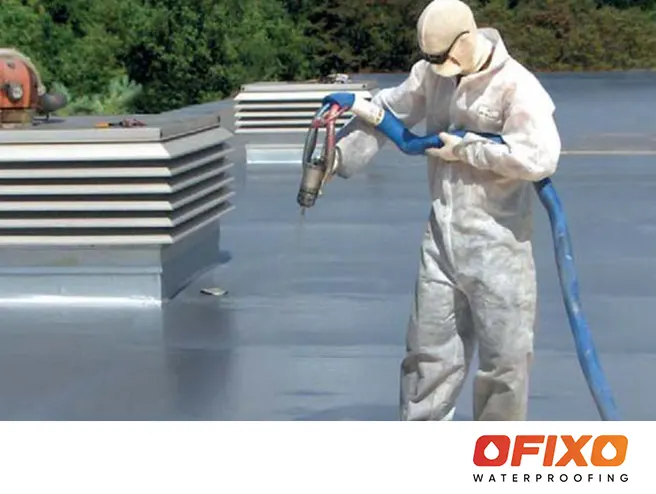
Reinforced membrane waterproofing using an APP modified bitumen membrane works well where the geometry is simple. For small planters with awkward corners, upstands and pipe penetrations, liquid applied waterproofing using a PU liquid membrane is usually the better answer because it produces no laps in exactly the places laps fail. Our comparison of cementitious versus liquid applied membranes covers the selection logic.
Two non-negotiables. Confirm root resistance, because standard bitumen has none and roots will find a lap. If the membrane is not certified root resistant, a separate root barrier is mandatory and must run up every wall to finished soil level. And flood test the planter before anything goes back in, 24 to 48 hours with the outlet temporarily plugged, witnessed and signed off. Finding a defect at that point costs a morning.
Frequently Asked Questions
How much drainage does a planter need?
A continuous drainage layer across the full base, a fall of at least 1:80 toward the outlet, and an outlet sized for peak irrigation plus a storm allowance. Depth of the drainage board matters less than continuity and gradient. A 10 mm board with a fall outperforms a 40 mm cell laid flat.
Do I need a drainage layer if the planter has drainage holes?
Yes. Holes drain only the soil immediately above them. Everything else stays saturated because water will not move sideways through soil fast enough to reach the hole. The drainage layer is what gives water a horizontal path.
Should I put gravel in the bottom of a planter?
No. Water will not pass from fine soil into coarse gravel until the soil above is fully saturated, so a gravel layer raises the waterlogged zone rather than lowering it. Use a drainage board or cell with a filter fabric over it.
Can a planter be waterproofed from the outside?
Not effectively. Water pressure acts from the inside, and external tanking is pushed away from the substrate rather than held against it. Planters are tanked internally, with the membrane dressed up all internal faces and over the rim.
How often should planter drainage be inspected?
Clear outlets quarterly and inspect the rodding points at the same time. Given dust deposition and daily irrigation, planters silt faster here than the manufacturer’s maintenance schedule assumes. This fits naturally into an annual maintenance contract alongside villa maintenance or planned building maintenance visits.
What weight does a planter add to a structure?
Saturated growing medium runs roughly 1,400 to 1,800 kg per cubic metre depending on the blend, plus the planter construction and the planting itself. A 600 mm deep bed is therefore close to a tonne per square metre saturated. Always design against the saturated figure, and verify capacity before adding planters to an existing deck. Where capacity falls short, structural strengthening is an option.
Get the Section Right Before the Soil Goes In
Everything that makes a planter work is buried the moment it is filled. A drainage board, a filter fabric and a correctly positioned outlet together cost a fraction of the planting above them, and they are the difference between a bed that performs for twenty years and one that has to be excavated twice.
Three things to confirm on site: the filter sits above the drainage layer and not below it, the base falls toward an outlet that can be rodded without digging, and the waterproofing has been flood tested and signed off before anything covers it.
If you are detailing podium planters or raised beds, or you have existing ones that flood, we can review the section before it is built or investigate what is wrong with one that already exists. Our roof waterproofing and wider waterproofing services teams handle both. Book a free roof survey and we will take a look.