
Rebar Corrosion Specialists · Dubai & UAE
Concrete Spalling Repair – Treating Rebar Corrosion and Reinstating Damaged Concrete.
Specialist spalling repair across Dubai – addressing the rebar corrosion that’s eating the structural steel inside your concrete. The visible damage (chunks falling, rust stains, hollow patches) is downstream of the actual problem: chloride or carbonation has reached the rebar, and corrosion expansion is breaking the concrete from the inside. Diagnose, treat, reinstate.
- Rebar Treatment
- Polymer-Modified Mortar
- Safety-First Response
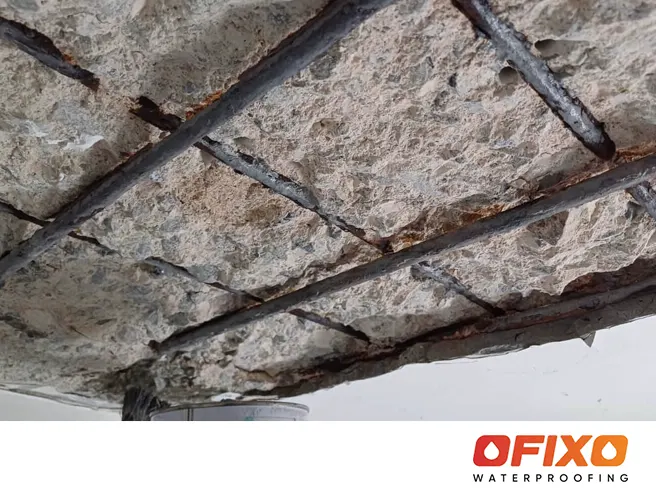
Corrosion-Driven Damage
What is Spalling Repair?
Spalling is the visible failure mode of reinforced concrete attacked by rebar corrosion. Chloride ions or carbonation reach the steel inside the concrete, the rebar starts rusting, and rust takes up roughly 7–10× the volume of the original steel. That expansion pressure splits the concrete from the inside – first cracks, then bulging, then chunks falling away.
Spalling repair removes the damaged concrete back to sound substrate, treats the corroded rebar with corrosion-inhibitor coating, and reinstates the original profile using polymer-modified repair mortar. Distinct from Concrete Crack Repair (which uses epoxy injection to bond sound but cracked concrete): here the concrete itself is gone and needs physical rebuild. Always paired with diagnostic testing to understand the cause – chloride, carbonation, or both.
Why It Matters
Four Reasons Spalling Is Urgent.
Of all concrete failure modes, spalling is the one with the shortest fuse. Once it’s visible, the damage progression accelerates – and so do the consequences.
Safety Risk First
Falling concrete chunks are a documented safety hazard – pedestrian areas below spalled facades, parking structures, and balconies have specific liability exposure. Action becomes legally non-discretionary once visible spalling is documented.
Damage Accelerates Itself
Once a chunk has fallen, the exposed rebar corrodes 10× faster – direct exposure to air and chloride-laden moisture. What was a single spalled patch becomes multiple patches within months. Spalling spreads.
Lost Structural Capacity
Severely corroded rebar has reduced cross-section and reduced tensile strength. Once corrosion damage exceeds 20% of original rebar area, structural capacity is materially compromised – and rebar replacement enters the scope.
Cost Multiplies Per Stage
Stage 1 spalling (early stage) might cost 1× to repair. Stage 4 (chunks already fallen) typically costs 5–10× the same scope – plus scaffolding, plus safety protection, plus possible engineer redesign. Early intervention is dramatically cheaper.
Diagnostic Timeline
Catch It Early. Scope Stays Small.
Spalling damage follows a predictable progression. Knowing which stage your concrete is in determines the repair scope, the cost, and how fast you need to act. Stage 1 is preventive; Stage 4 is reactive.
-
01
Early Monitoring
Hairline Cracks at Rebar Lines
Visible: Fine cracks following the line of buried rebar – often missed because they look cosmetic.
Cause: Rebar corrosion has started. The first product of corrosion (a hard rust scale) is creating tensile pressure inside the concrete.
Repair Scope: Diagnostic testing + surface sealing + anti-carbonation coating. Smallest possible scope. Catch this and you’ve prevented the next three stages.
-
02
Active Corrosion Visible
Rust Staining on Surface
Visible: Orange/brown rust stains bleeding through the concrete surface, especially along rebar lines.
Cause: Active corrosion now producing soluble rust products that wash out through micro-cracks. The bulk of the rebar is still embedded but damage is progressing.
Repair Scope: Diagnostic testing + targeted patch repair where rebar is approaching critical loss + anti-carbonation coating across the area. Moderate scope.
-
03
Serious Hollow Patches
Concrete Bulging & Delamination
Visible: Areas of concrete sound hollow when tapped – the concrete has separated from the rebar but hasn’t fallen yet. Sometimes visible bulging.
Cause: Rust expansion pressure has broken the bond between concrete and rebar. The concrete is no longer protecting the steel; corrosion now accelerates dramatically.
Repair Scope: Remove all delaminated concrete + full rebar treatment + structural assessment + polymer mortar reinstatement + protective coating. Substantial scope.
-
04
Urgent Safety Risk
Spalling Chunks Falling Away
Visible: Concrete chunks have fallen, exposed corroded rebar visible. Rust streaks on walls below. Pedestrian/vehicle area below at risk.
Cause: Final-stage rebar corrosion. Concrete protection completely lost in spalled areas. Often combined with significant rebar cross-section loss.
Repair Scope: Immediate safety hoarding + full structural assessment + rebar replacement (where loss exceeds threshold) + extensive patch repair + likely CFRP strengthening + full protective coating system. Highest cost scope.
If your concrete is at Stage 1 or 2, you’re in the cheap-and-easy window. Stage 3 or 4 means scaffolding, safety protection, and structural engineer involvement. Catch it early.
Inside the Repair
Anatomy of a Properly Reinstated Patch.
Spalling repair isn’t ‘fill the hole and paint over it’. It’s a 5-stage layered build-up where each layer addresses a specific failure mode. Get any layer wrong and the patch falls out within 12 months.
-
01
Chip Back to Sound Concrete
Remove all delaminated and corrosion-damaged concrete back to substrate that gives a clean ring when hammer-tested. Reveal at least 20mm of clean substrate behind the rebar – leaving rust-damaged concrete sabotages the bond.
-
02
Clean Rebar to Bare Metal
Grit-blast or wire-brush exposed rebar back to bright steel – remove ALL rust scale. Existing rust under a new patch is the #1 cause of repair failure within 2 years.
-
03
Apply Corrosion-Inhibitor
Brush-apply zinc-rich corrosion-inhibitor coating to ALL exposed rebar. This protects the steel chemically – even if moisture eventually reaches it again, corrosion is dramatically slowed.
-
04
Bonding Primer to Substrate
Apply polymer-modified bonding slurry to the prepared concrete substrate. Creates the chemical bond between old and new – without it, the patch is mechanically pressed in only and will eventually pop out.
-
05
Polymer-Modified Mortar
Build up the patch in layers using polymer-modified repair mortar (deep patches in 2–3 lifts, with cure between). Final lift screeded flush. Optional anti-carbonation topcoat applied across the full surface.
Step by Step
Our 6-Step Spalling Repair Process.
Every project follows the same disciplined repair sequence – adjusted for spalling stage, exposed rebar condition, and surrounding structural context per element.
-
01
Chip Back to Sound Substrate
Hammer survey to find ALL delaminated areas (often larger than the visible damage). Mechanically chip back damaged concrete until you hit substrate that gives a clean ring. Reveal at least 20mm clean behind each rebar.
-
02
Clean Rebar to Bright Steel
Grit-blast or wire-brush all exposed rebar back to bare metal. Remove every flake of rust scale. If rebar cross-section loss exceeds 20%, structural consultant called in for replacement design – supplementary rebar may be added.
-
03
Apply Corrosion-Inhibitor
Brush-apply zinc-rich corrosion-inhibitor coating to all exposed rebar – typically 2 coats. Allow proper cure between coats. The chemical protection that keeps the rebar safe even if moisture eventually reaches it again.
-
04
Bonding Primer to Substrate
Apply polymer-modified bonding slurry to the prepared concrete substrate around the patch perimeter. The chemical bond layer between old and new – get this right and the patch becomes monolithic with the substrate.
-
05
Polymer-Modified Mortar Build-Up
Build up the patch in lifts (typically 20–30mm per layer for deep patches), with proper cure between lifts. Final lift screeded flush to original profile. Texture matched to surrounding concrete where visible.
-
06
Anti-Carbonation Protection
Optional but recommended: anti-carbonation coating applied across the full element (not just the patch). Blocks future CO₂ ingress – preventing the next round of spalling. Documented handover with warranty paperwork.
Why Ofixotech
Six Reasons Engineers Specify Ofixotech.
Spalling repair done right is unforgiving – skip rebar cleaning or use the wrong mortar and the patch fails in months. Here’s why we’re the specialist subcontractor for this scope.
Diagnostic First
On-site testing – carbonation depth, chloride content, cover meter, half-cell potential – identifies the corrosion driver before we chip a single brick. The wrong diagnosis means the next round of spalling appears within 5 years.
Zinc-Rich Inhibitor
Manufacturer-grade zinc-rich corrosion-inhibitor coating on every exposed rebar – the chemical protection layer. The single most under-specified step in failed repairs across Dubai.
Polymer-Modified Mortars
Sika, Fosroc, BASF, Mapei systems – manufacturer-backed polymer-modified repair mortars with documented bond strengths, shrinkage values, and warranty support.
Structural Engineering Partnership
For Stage 3–4 spalling where rebar replacement enters scope, we coordinate with your structural consultant – they design, we execute. Clear scope separation.
Safety-First Site Management
Falling concrete is a documented site hazard. We mobilise with safety hoarding, exclusion zones, and pedestrian protection on day 1 particularly for facade and parking-deck work.
ICRI Methodology
International Concrete Repair Institute (ICRI) Guideline 310.1R for surface preparation and 310.2R for selecting concrete repair materials – applied on every project, documented in handover.
Falling Concrete Chunks? Don't Wait.
Stage 4 spalling is a safety risk. Free inspection within 48 hours, safety hoarding mobilised same day where needed. Documented quote within the week.
or WhatsApp +971557705568
Answered
Concrete Spalling Repair FAQs.
The questions Dubai facility managers, building owners, and structural consultants ask most about rebar corrosion and spalling repair.
What’s the difference between this and Crack Repair?
Different damage, different fix. Concrete Crack Repair treats SOUND CONCRETE that has cracked – epoxy injection bonds the crack faces back together, the concrete itself is intact. Concrete Spalling Repair treats PHYSICALLY DAMAGED CONCRETE where chunks are missing and rebar is exposed – you can’t inject what isn’t there. We remove damaged concrete, treat the corroded rebar, then physically rebuild the missing concrete with polymer-modified mortar. Both services in-house; we diagnose which applies before scoping.
I see rust stains on my building – is that spalling already?
Rust staining is Stage 2 in our progression. Active corrosion is happening inside the concrete, but the chunks haven’t started falling yet. This is actually the best stage to catch it – diagnostic testing + targeted repair + protective coating costs a fraction of waiting for Stage 4 (chunks falling) when scaffolding, safety protection, and possible structural repair enter the scope.
How long will the repair last?
Done correctly with diagnostic-led specification, manufacturer-grade products, and anti-carbonation topcoat: 20-30 years is realistic. Done badly (skipping rebar cleaning, wrong mortar, no protective coating): the patch falls out within 12-24 months. The difference is process discipline, not product cost.
Will the repair look obvious?
Polymer-modified mortar can be colour-matched and texture-matched to existing concrete reasonably well, but a patch will typically be visible on close inspection. For facade work where appearance matters, the anti-carbonation coating applied across the full element unifies the visual surface – patches blend into the recoated face.
What if my rebar has lost cross-section?
Rebar cross-section loss exceeding 20% is the typical threshold where we bring in a structural consultant. Options: supplementary rebar tied alongside the original (most common); CFRP strengthening to compensate for lost capacity; or in severe cases, structural redesign of the element. We work as the specialist subcontractor to your consultant’s design.
Can you work on occupied buildings?
Yes. Most spalling repair happens in live buildings – we coordinate with FM teams on access, hoarding, exclusion zones, and noise schedules. For facade work above pedestrian areas, safety protection mobilises on day 1; the actual repair work follows once the area is secured. We’ve delivered scopes ranging from a single column to full tower facade restorations.
Why do I need anti-carbonation coating after the repair?
Because if you don’t address the cause, you’ll be repairing again in a few years. The original concrete failed because CO₂ or chlorides reached the rebar – anti-carbonation coating blocks that ingress on the repaired AND surrounding concrete. Without it, the next round of spalling appears in adjacent areas within 5-10 years. With it, you’ve reset the clock on the whole element.
What manufacturers and warranties?
Sika, Fosroc, BASF Master Builders Solutions, Mapei – manufacturer-grade polymer-modified mortars and anti-carbonation systems. Combined warranty pack at handover: manufacturer product warranty (typically 10-25 years on premium systems) plus our written workmanship guarantee (1-2 years on installation). Documented for the asset register and any insurance / defects liability requirements.